Here is a direct paste of my report, and a link to
the file.
Build a Raspberry Pi Hadoop Cluster
in Record Breaking Time!
a tutorial by Jacob Leibeck
For my Computer Networking project, as opposed to doing something web-based, I chose to research constructing a Hadoop computing cluster using the Raspberry Pi, an affordable linux-based embedded system. Hadoop is a service that allows you to run distributed Java programs that call on the connected nodes to break down a larger task to several much smaller ones, for each individual node to process and eventually return. It’s a fun task that puts your Unix skills and networking knowledge to the test. I had quite a great time building it, and I hope you do too!
What you’ll need:
For the input:
A compatible monitor
A USB keyboard
For the Nodes:
For connectivity:
A networking switch
A power strip
Creating the Master Image
The first step of this process will be creating our master node, as well as the image from which we will create all of our slave nodes. That being said, any changes you make on your master node will reflected across all the nodes. Furthermore, after you have your master node optimized, it becomes a matter of just copying the image on to the rest of the machines, and making a few small changes.
For the master image I recommend going with a 4GB SD. This is more cost-efficient and grants you the ability to write on any larger SD (due to filesystem expansion, you cannot go down in size). If you are purchasing several cards, consider buying from the same brand, as you may find that even with two brands of the same amount of storage, that they may actually contain different amounts of free sectors. For example, I created my master on an 8GB Sandisk card, but could not write that image to my 8GB PNY SD due to size limitations.
For the initial image, you will need to download a distribution of Raspbian from the Raspberry Pi website. Raspbian is basically a Pi-optimized version of Debian, which is in turn compliant with Hadoop. For writing images I suggest using win32diskimager, a simple no-hassle program for read and writing images onto machines.
After your master node is ready to go, go ahead and boot up the Pi into the monitor with a keyboard ready. Here’s a few housekeeping tasks you’ll need to cover in raspi-config before we get started with Hadoop:
Expand SD card
Set a password (make it simple, you’ll be using it a lotttttt)
Choose console login
Choose keyboard layout and internationalization options
Overclock (optional)
Change hostname to node1
Change the memory split 16mb
Enable ssh
go ahead and use sudo reboot to reboot. If you ever make any more-than-minor changes to the Pi, your best bet is to reboot and make sure these changes have taken place.
Next, you’ll want to check that you have a java distribution on the Pi. If you downloaded the most recent one from the Raspberry Pi site, you should be fine, but just in case, go ahead and check with java -version.
Next we’re going to set up a hadoop user for each node. Here’s some commands to get the account set up:
sudo addgroup hadoop
sudo adduser --ingroup hadoop hduser
sudo adduser hduser sudo
highlighted are the group we’ve created, along with the account.
Next we’ll need to configure ssh keys, so that our nodes can communicate to each other without passwords. Here are some more commands to get you started:
su hduser
mkdir ~/.ssh
ssh-keygen -t rsa -P “”
cat ~/.ssh/id_rsa.pub > ~/authorized_keys
Now let’s make sure that we can access the new user, and that ssh is configured properly by using su hduser followed by ssh localhost. If all is well you should be in a “connected” to yourself.
Configuring Hadoop
Go ahead and hook up your Pi to an existing internet-enabled network. The easiest method is probably a direct ethernet connection the router. If at any point you’re concerned with the Pi’s connectivity, you can check with ifconfig.
Once connected to the internet, go ahead and grab a distribution of hadoop and install with the following:
wget http://apache.mirrors.spacedump.net/hadoop/core/hadoop-1.2.1/hadoop-1.2.1.tar.gz
sudo mkdir /opt
sudo tar -xvzf hadoop-1.2.1.tar.gz -C /opt/
cd /opt
sudo mv hadoop-1.2.1 hadoop
sudo chown -R hduser:hadoop hadoop
This is the last time we’ll need to use the internet, so you may disconnect. At this point, you should give the Pi a static IP, so that within the context of the switch, it will always be the same. Do that by editing /etc/network/interfaces to reflect the following changes:
iface eth0 inet static
address <your IP of choice>
netmask 255.255.255.0
gateway: <gateway of choice>
Be sure to make it a valid IP you can remember, because you’ll be using it and the adjacent ones when you connect the Pi’s to the switch. You may consider rebooting your Pi at this point.
Back in the land of Hadoop, we’ll need to configure some environment variables. In /etc/bash.bashrc or in hduser’s ~/.bashrc add the following lines:
export JAVA_HOME=$(readlink -f /usr/bin/java | sed "s:bin/java::")
export HADOOP_INSTALL=/opt/hadoop
export PATH=$PATH:$HADOOP_INSTALL/bin
Now, to test our hadoop path, run hadoop version somewhere outside of the /opt/hadoop/bin folder.
In /opt/hadoop/conf/hadoop-env.sh, uncomment and change the following lines:
# The java implementation to use. Required.
export JAVA_HOME=$(readlink -f /usr/bin/java | sed "s:bin/java::")
# The maximum amount of heap to use, in MB. Default is 1000.
export HADOOP_HEAPSIZE=250
# Command specific options appended to HADOOP_OPTS when specified
export HADOOP_DATANODE_OPTS="-Dcom.sun.management.jmxremote $HADOOP_DATANODE_OPTSi -client"
In /opt/hadoop/conf edit the following xml files to reflect the following:
core-site.xml
<configuration>
<property>
<name>hadoop.tmp.dir</name>
<value>/hdfs/tmp</value>
</property>
<property>
<name>fs.default.name</name>
<value>hdfs://localhost:54310</value>
</property>
</configuration>
mapred-site.xml
<configuration>
<property>
<name>mapred.job.tracker</name>
<value>localhost:54311</value>
</property>
</configuration>
hdfs-site.xml
<configuration>
<property>
<name>dfs.replication</name>
<value>1</value>
</property>
</configuration>
Now, we will need to create a temporary file system for Hadoop to work with, so that it can pass files between the nodes:
sudo mkdir -p /hdfs/tmp
sudo chown hduser:hadoop /hdfs/tmp
sudo chmod 750 /hdfs/tmp
hadoop namenode -format
Running your first Hadoop program
To check that you have properly configured all your Hadoop install correctly we will run a sample single-node program, that counts the words in the Hadoop license agreement. It’s not glamorous, but it’s just a few steps away from having a true pi cluster.
As hduser, start the following two processes:
/opt/hadoop/bin/start-dfs.sh
/opt/hadoop/bin/start-mapred.sh
Now you can check that all of the proper services have started with the jps command. These are all session related things, so numbers will vary, but you should see things like Jobtracker, Jps, NameNode, SecondaryNameNode, TaskTracker and DataNode. Even if you don’t see all of them, feel free to try to run the program in the case that they’re not needed.
Before we can compute, we need to migrate the license agreement into the Hadoop file system using
hadoop dfs -copyFromLocal /opt/hadoop/LICENSE.txt /license.txt
Now we enter the following command to begin the program, creating an output file in the Hadoop file system. This may take a little while to run.
hadoop jar /opt/hadoop/hadoop-examples-1.2.1.jar wordcount /license.txt /license-out.txt
Last, import the output to the local filesystem:
hadoop dfs -copyToLocal /license-out.txt ~/
You can now poke around in this directory to see the results of the computation. The file part-r-00000 should be the proper results of the word count.
Finally to remove any files you’ve added to the HDFS system, run the following command:
rm-rf /hdfs/tmp/*
Setting up the Network settings for the Nodes
By now you should hopefully know how many Pi’s you want to use. Even if not, you may add extra nodes, that your Hadoop sessions will (hopefully) realize are not in use.
In etc/hosts you can go ahead and create a DNS-like association that matches up the other nodes with IPs. Here is what mine looked like:
<your ip+0> node1
<your ip+1> node2
<your ip+2> node3
And so on. In Hadoop we can go ahead and distinguish node1 as the master, and the others as slaves. This can be accomplished by placing node1 in /opt/hadoop/conf/masters, and in /opt/hadoop/conf/slaves add all of the nodes to make them part of the cluster.
Now go back to some of the XML files we edited earlier and make a few changes:
core-site.xml
<configuration>
<property>
<name>hadoop.tmp.dir</name>
<value>/hdfs/tmp</value>
</property>
<property>
<name>fs.default.name</name>
<value>hdfs://node1:54310</value>
</property>
</configuration>
mapred-site.xml
<configuration>
<property>
<name>mapred.job.tracker</name>
<value>node1:54311</value>
</property>
</configuration>
Cloning the Node:
(This doesn’t require a terrible amount of attention and can easily be completed at your leisure)
With that last change, we are now ready to clone the master image! Do this by inserting your SD in your computer win32diskimager, writing in a directory and filename (<something>.img) and pressing read for the proper drive. Hold on to this image, as it will be needed for every other node.
Once it has been made, start writing the image to all of your other SDs.
Building the setup:
Now begins the part where we construct the cluster! Connect all of your Pis to the switch using ethernet cables. Now add power to all the Pis and boot them up. This can be quite messy, so I suggest embracing some kind of layout like the following:
: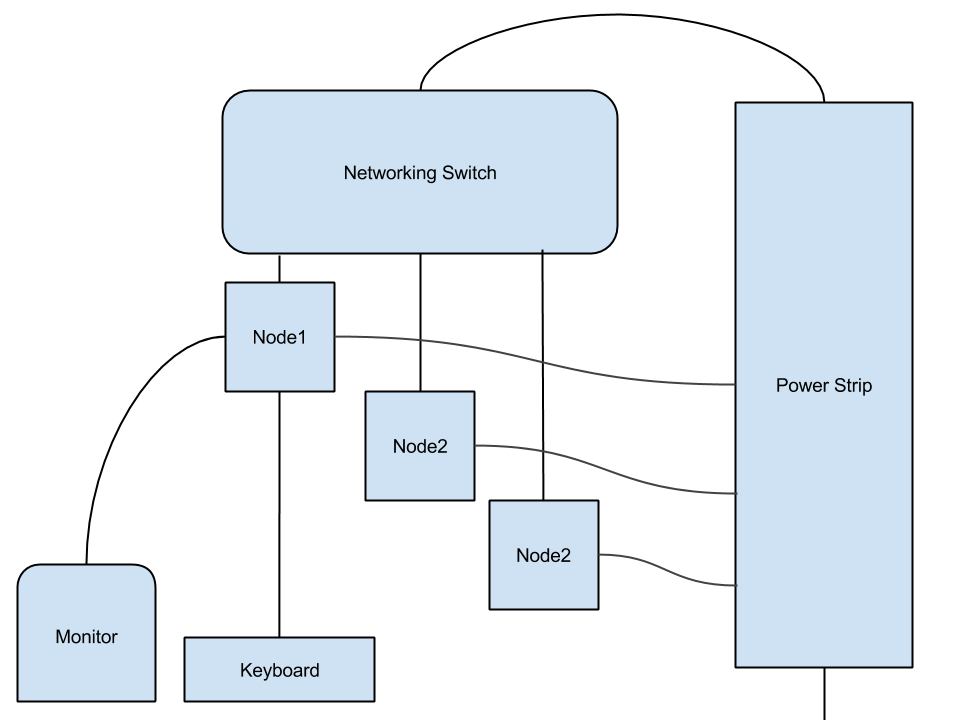
All you should have to do is change the hostname and IP address on each of the new nodes.
Back in node1, go ahead and attempt to ssh into each of the nodes. You should be able to do this will of the settings we made, but strange hardware failures can still happen! Remember that you can also ping everyone. If you were able to connect to everyone without a password, you are ready to run a distributed program! Step back to the wordcount example, or look up other Hadoop example programs. Congratulations on your massively-computing mass of wires!
Optimization and User Friendliness:
You may have felt like a technician running all of these hardcore hadoop commands. In order to make the process simpler, you may consider creating aliases to simplify commands or cut multiple commands to one. For instance, by combining the all of the wordcount lines and creating a singular file in the HDFS filesystem, you could simplify the wordcount program to just be
wordcount <input_file>
Same goes with contacting and networking with the other Pis. You can write one command that pings every node to check the status, or maybe even changes all of the IPs, if you’d like to conform to a network. This is only the beginning of an amazing Hadoop adventure, so spend time customizing your image to make it the best it can be!
Sources and Contributions:
To my build my cluster I followed this tutorial:
To read about my own misadventures in building the cluster, check out my blog:
Thanks to Dr. Scott Heggen for the great Networking class, and Dr. Matt Jadud for his support in helping me construct the cluster.
Thanks also to NCAR for the privilege to work with their laboratory constructing Pi clusters, and I’m very sorry I couldn’t join you this summer!


