Saturday, December 27, 2014

Drone Following Project #15: ROS development

I uploaded an early, early version of the ROS package that listens to the device and sends the info to the Drone. You'll notice that the first executable is called 'button_launch'. That's because the first part I want to work with is sending the Drone to TakeOff mode and Landing mode simply from pressing the Arduino button. The full executable will likely look similar though, as this functionality is also included in the full scope of the project. As you can see the use of the new bool message ('/Lakitu/Device/NewState') has helped organize things greatly. I still feel that I can cut down the amount of times State is subscribed to with some clever implementation, but I'm a bit tired for it now. My pseudocode stab is:

...
NCallback(Bool msg){
 ...
 ...
 ...
  r_nustate=msg->data;
}

SCallback(UInt8 msg){
  r_state=msg->data;
}

Subscribe('NewState',1000, NCallback);
if (r_nustate ==true){
   Subscribe('State',1000, SCallback);


switch(r_state):
...


This way we only call on that extra subscriber when we need it, and rely on global memory otherwise. I have kind of PTSD from being really careful about the memory from working the Velodyne HDL-32E, since I was having to transfer a lot of pics and clouds at the same time.

 Once this is all hashed out, I'll begin testing using the special String publisher I made, then maybe the Drone's LEDs, and then finally the Drone actually taking off and landing. You can never be too careful when playing with the Drone indoors, or for an extended amount of time. Then it's on to the glorious world of IMUs.


On the topic of Velodyne, I'll be making my Velodyne code available on Github slowly. It will be a private repo, and it may take a while because I want to document it really well. I'll make an update when it becomes available.

Friday, December 26, 2014

Drone Following Project #14: Updated Arduino sketch

I'm feeling better, so I went ahead and fulfilled all of my improvements for modifying the Arduino sketch, along with some new features. Here's a quick overview of the new features:
  • Two publishers (Uint8 for state, and Bool for new state)
  • Consistent "/Lakitu/Device" name scheme
  • 3 LEDs (blue, yellow, green)
  • 4 states (Landing, DronePosition, Takeoff, Calibration)
The two publishers were already explained, but why did I add a whole new state? Well, again, I was thinking ahead at the steps that need to be taken when GPS is implemented. We've taken it for granted so far that the Drone is going to translate its position from the device, however, I failed to addressed how the Drone would receive its initial distance from where the device will be. There are a few sensing and distance ways to go about this, but I worry that many of them limit the set of scenarios greatly. I currently have it in mind that you will be able to press a button to generate a GPS location for the Drone that will change as the Drone moves. Whether this method is successful or not, I feel that it's good to secure a state where the user can can safely move around and find the initial distance from the drone without the danger of it moving.

Anyways, you can can see the changes made on Github. Enjoy!

Wednesday, December 24, 2014

Fooling around with RetroPie #1: Setup and Performance

I haven't abandoned work on my Drone project, but at the same time, I've been really sick... I came down with the flu two days, and have been practically immobile since. Today I've managed to do a bit more moving around, so I finally got around to playing with the Raspberry Pi my girlfriend bought me for Christmas. It came with one memory card with NOOBS pre-loaded onto it, but for the purposes of playing with emulation. After I spent this morning constructing a pi-box to house my Raspberry Pi in, I began with Lifehacker's great tutorial on setting up Retropie for the Raspberry Pi. I found it pretty easy to follow, but there was a few things I wanted to note for anyone else pursuing emulation on the Raspberry Pi (or any other hardware for that matter):


  • There's a million ways to do anything, especially when you're working this deeply with a computer system. This tutorial 

  • Emulation is a precise art. As much as we all enjoy running games on our computers, there's so much going on that you'll find it varies drastically from machine to machine. Even in the case of two Pi's, you'll see different people having different issues. All sorts of changes can made, some of which you may not have even thought of, that may help performance on any given emulator.

    Sadly, this is not only the case with emulators, but specific ROMs as well. There are a few games, even generations old, that emulation has yet to figure out, such as Pokemon Snap. 

Thankfully, the ceiling is always expanding, and what wasn't possible on high-end hardware years ago is possible on mid-range and low-end hardware today. Thankfully, if you can put frustration aside you'll find that the reward of a small, customizable 35$ all-purpose emulation machine that only requires a TV (of any kind!) and a USB controller (of any kind!) is worth the wait. 

My Experience

So after getting my micro-SD properly imaged, I booted into RetroPie and did some configuring.

However, I was in a precarious position... I'm in the basement of the home under quarantine with the flu, far from ideal when you need a wired connection. After a little research I found that there is another-- debatably more convenient option-- that uses only a USB stick. That's right! All you need to do is stick a USB drive in your Raspberry Pi with everything configured, and it'll automatically create a directory of ROMs (appropriately called 'roms') which you can place ROMs in from your computer and then migrate to your Pi without the hassle of dealing with Cyberduck or any other ftp/ssh clients.

After I made a decent selection of ROMs playable, here were some of the performance issues I noticed:

  • NES: Initially so slow it was unplayable. Nearly half-speed across all titles. Strangely though, I came back later to find most titles between 90% and full-speed.
  • SNES: Great! No complaints out of the box. The sound effects seem slightly louder than the original hardware, but that could be due to the television. 
  • N64: Wouldn't even boot, ha. Checked out the logs, and it never clearly displays an error-- just says stopping emulation. This seems to be the great enigma of Raspberry Pi emulation at this point in time.
  • PS1: Worked surprisingly well, though all I played on it was famously 2D game with little fanfare. 
  • GBA: Required a bios, which I didn't feel like importing at the moment. More on that at a later date.

What's Next

So this is all pretty cool, but how can we make it more interesting?  Well, there's a few fields that can be pursued from this point.  Here are just a few ideas:

  • External Modification:The Raspberry Pi has all of the electrical potential (no pun intended) of the Arduino, and can have buttons and switches all with their own purpose.What's a console without a reset or power button? And that's just a starting point.
  • Internal Modification: Besides just contributing to the altruistic cause of getting the emulators to run better, there's also a lot of customization to be had within the EmulationStation suite itself. Right now it looks great in HD, but I'd like to customize to my liking-- more sounds, descriptions and nostalgia would be great.
  • A prepared package: Putting these two things together I'd like to make some cool custom consoles-- on a budget. Imagine a dedicated console to your favorite franchise like Mario or Zelda, featuring all of the games, a relevant gui, and an appropriate soundtrack-- and maybe even other features, like Ebooks, images, and the like. 

My Project

I'm wanting to do just that eventually for the famous fighting crossover Super Smash Bros. Imagine cycling through the abundant character roster, panorama style, and picking a character, only to be treated to their entire history of memorable games. Of course this would be a huge challenge, not only on the graphical end, but also in getting all of the emulators to function reasonably. I think that first I would try to do the same thing for the beloved Mother franchise, with a few extra touches. Since the Mother series is only limited to a few select titles, this would be a much easier task to accomplish. There are plenty of existing assets to work with, both original and fan-made, and the fact that they only span three 2D consoles, allows for work on some extra features, like maybe the addition of NES and SNES controller ports. 

But that's thinking super far ahead, at least for the time being. For now I intend to just enjoy my awesome emulation machine and catch up on some classics. Feel free to leave comments with any suggestions. 

Monday, December 22, 2014

Drone Following Project #13: State of Grace

Work on the "Lakitu" ROS package has began! I'm trying my best to make headway, but unfortunately, I'm also ill at the moment. Currently I'm working on making the Arduino state machine launch the Drone via rosserial. In order to do that though, I'm slowly realizing I could modify my Arduino sketch in a slight manner in order to greatly increase the efficiency of how the two objects communicate. For the time being, the Arduino is constantly broadcasting it's state, and the program is constantly receiving it. As I was implementing this, I realized that this is quite inefficient, if you consider what all is going on in this manner:
  • /Lakitu/Device_State is constantly sending out messages regarding states.
  • The ROS package is constantly receiving these messages.
  • The ROS package is constantly evaluating what to do with these messages.
  •  The ROS package is constantly sending out messages to drone topics such as "/ardrone/takeoff" and "/ardrone/land"
The problem is that we always want the drone to be aware of what it should be doing, but not be bogged down with too much information. Therefore I propose we take a step back and modify the Arduino sketch to now send out two messages, the original and a new boolean message that signifies if this is the first change to a new state. This adds only a slight amount of added stress on the Arduino in order to take a large amount off of the ROS node-- which quickly becomes bungled as the 'communicator' for all aspects of the program. This will reduce our complicated web of 'if' statements constructed from handling the state machine to a much simpler series that will only ever be evaluated if it is the first spin of a new state.

After this has been handled, I'll be working with first just getting some strings on the ROS terminal to match these states, then the Drone's LEDs, and then, finally takeoff and landing (if I can find the space to safely do so). From this point I'll be moving on to handling the IMU's data and orientation, and then GPS.

-----------------------------------------------------------------------------------------------------------------------------------

Additionally, I'll be working on making things more uniform. The device will follow the topic convention of

/Lakitu/Device/<topic>

And things on the ROS end will be 

/Lakitu/<topic>
 

Tuesday, December 16, 2014

Drone Following Project #12: ROS and ardrone_tutorials

Today, during my lunch break I connected my Drone to ROS and gave it a whirl. This made signficantly easier by MikeHamer's ardrone_tutorials repo. In fact, I'd say that this is a great fit for any hobbyist, besides the fact that you have to set up and configure ROS in Linux (though I heard thay make preset virtual machines for this).

Whereas I'm using to breaking my neck attempting to connect to the Velodyne or other ethernet based utilities, connecting to the Drone was a synch. Perhaps this is due to the fact that it has own wi-fi connection, and you don't have to fool with all of that other garbage. Anyways, I managed to quickly get outdoor_controls.launch working. It pops up a handy camera feed GUI, and from this point you can use WASD style controls to steer the drone in all directions. More importantly, we can use rostopic to navigate the many, many topics that the ardrone_driver node produces... Thankfully, it is fairly well organized. There is a direct nav topic, IMU topic, a set for each camera, and even one for an emergency reset. I suggest you peruse ardrone_autonomy's readme for more info-- it is really well written. Below you can see some of my screenshots from my flights, along with the data produced.


Sorry for no IRL pictures of the drone in action. I'm sure we'll get enough of that later. Now on to deciphering those topics, and learning to put them in code!

Monday, December 15, 2014

Drone Following Project #11: Project Name!

This is a stupid and insignificant detail, but I've finally realized what to call this project! I originally had it under a Repo known as "AirCat", an obvious play on "AirDog", but I've found something much better.

Do you remember Super Mario 64?

Even if you don't, perhaps you recognize this character:


This is Lakitu. He got his start throwing spined turtles ("Spinies") at Mario in the original Super Mario Bros., but as time went on Nintendo chose to give him a more friendly role in future titles, such as an assistant in Paper Mario, the flagger in Mario Kart, and most importantly, the cameraman in Super Mario 64.
His significance as the cameraman was a pretty unique one at the time. While there may be an existing exception, not many thought to actually characterize the camera in a video game before, and most treated it as simply a mechanic. In Super Mario 64, Lakitu is actually the first character shown in the game world, flying down as Mario heads to the castle, and taking the place as his cameraman. From this point on, the player controls not only Mario in saving Princess Peach, but as Lakitu as well, helping properly angle the camera so that the player can more easily see what is around them. Today, I had the realization that this is not unlike the intended result of this project. Therefore I choose to name the project Lakitu. 
If I complete it in a timely manner, I'll be sure to make my own Super Mario 64 video as a demonstration. Hopefully I can attract the gaming community to this project and get the word out. It's good to balance yourself as engineer by surrounding yourself with clever and imaginative people. It could mean inspiration for your next part of the project! I foresee the implementation of Oculus Rift being a popular topic of discussion.


Bonus asset:


Sunday, December 14, 2014

Drone Following #10: Added ROS capabilities to sketch

Tonight I added ROS functionality to Arduino sketch. It's just a few lines of code, but they have great implications! The LED state machine is now a Publisher and sends its information via the serial port, so now anything connected to ROS on my laptop can read what state the device is in. Logically, the next step is to start working with the Drone. Here are some screenshots from it in action:


As you can see, rosserial got a little upset at my procedure... and I'm not sure why. All 3 states still work in action, but I get lots of mean text as opposed to the approval you get from other message types. A lot of threads seem to indicate this is due to the relative message size and buffer size for the particular board, but I seem to be well within the limits of my ATMEGA32 board. I'm investigating it currently, but as it works, I'll also be moving on to something a lot more exciting.


Drone Following #9: Soldering, State Machine, Github.


I've been quite productive since my finals (finally) ended.

First of all, my chips arrived! I was quite impressed with how small they were! The LSM9DS0 is about the length of half your thumb, and the level converter only a third of that. Not long after they arrived, I snuck out to the school's tech lab and soldered them together. It was nice to get back in the saddle and sit down with the ol' soldering iron. It feels like knitting, but with heat. My work isn't what it used to be, but I think it's enough to get the job done.


Next, I enjoyed my break exactly as envisioned. Tonight I spent the night doing some programming, the beginning of the drone following project. This consisted of creating an 3 state finite state machine. Right now it doesn't do much other than turn on LEDs in a sequential order and via the serial port tell you what state it's in.


But this is very important! After all, when I integrate this with the Drone controls, you don't want it ever going to the wrong state at the wrong time... This could mean taking off or landing at the wrong time. That being said, there was also some fool-proofing to be done-- for example, the Arduino reads super quick (sometimes), so you need to put a time delay in for the button press, or it may quickly transition between states. I handled this by having it hold for a second in a loop if the button is held. Right now all of the states are working as intended, so the next move will be ROS integration-- sending the state to ROS. From here, the Drone will read it, and respond accordingly. The states are as follows: Landing Mode, Takeoff Mode (indicated by a yellow LED) and Calibration Mode (indicated by a green LED). Calibration is where the Drone begins to follow movement.


Finally, I've made myself available on Github. It's been a while since I used it consistently, but I've realized that if I want to show people what I'm made of, I have to... show people what I'm made of. Therefore, I'll try to be consistent in uploading any code changes for your own viewing at my own github profile, Gariben. Here you can find the code for the state machine mentioned, as well as handy Fritzing diagrams and schematics. I'll usually include those in the blog, like so:
Currently, the code is housed under the "AirCat" repository. I didn't quite know what to name the project, since "Drone Following" will properly get me a pitchfork mob from an uneducated following, so I thought I'd just mimic the AirDog project that features the Drone remote, since the ideas are similar. Anyways, I hope to continue work on this project along with work to those I've dedicated myself too, so I'll try to keep everyone updated. Be sure to stay tuned to my Github for the latest-- it always comes at least a little before the blog.


Friday, December 5, 2014

Drone Following #8: LSM9DS0 chip and sensor research

So I was in a position where I could make a Youtube video about Physics for some extra credit, so I took the opportunity to do some research on LSM9DS0, and all of it's components. In the video you'll also found how these components physically work.


The chip actually arrived today, and I have to say, I'm surprised at how small it is! I probably should be, but I can't help but be excited that that much information comes from a board small than my thumb.

This is finals week, so I'm going to desperately try to hold back from toying around with it, but I do need to go ahead and solder it next weekend before the lab closes. Then I can spend my break getting my Drone off the ground, and using the IMU. If I get where I want to go, I might try asking for a GPS shield for my birthday in January... Unfortunately I also need a wifi shield to communicate with the computer or the drone. : (

Tuesday, December 2, 2014

Building Robots #2: The Turtle

I believe it makes sense that the first robot I try to develop is a turtle robot. Turtle robots are simple in nature, not to mention I have a lot of experience with factory made ones, such as the Pioneer 3-DX. I think parts wise it will be the most simple as well.

What I have in mind will basically a smaller version of the Pioneer, using smaller motors. I think all I would need in terms of locomotion would be two small DC motors, and then a caster wheel. I would like the bot to be roughly the size of like a waffle iron, with two tiers of circular plates. the first housing the microcontroller and a little breadboarding room for sensors and the like, and the top being like a plate with a lip for storing anything external, or placing anything on top of it. I would like the top layer to be screwed on or hinged, so that you can easily access the microcontroller. I know this design is bizarre, but this is only an idea. I'll try to gradually get this on paper as I go along.

Programming wise, I will try to first make it teleoperated, of course. I would like to gradually implement autonomous controls, but only once I have a better understand of what's going on. I'll be using ROS for this of this, and I would like to start by connecting to it with different controllers, and then create a unique message system for it, modeled after the pioneer. The teleoperation may require a wi-fi shield, unless I want to use a giant serial cord.

I think I would enjoy stress-testing the payload. One of my favorite features of the Pioneer 3DX was the fact it can carry up to 23kgs, but I always (secretly) wanted to test those limits in the upward direction. I think if I ever seriously develop a full-size turtle, I would like to make one of it's key points a massive payload. As I've said time and time again, I've always considered the Pioneer a roaming footstool, with the purpose of carrying other accessories. So I think that will be my focus for future designs.

Anyways, next time I'm at it, we'll talk about making a DC motor go both ways, and cutting down that circuit to be as efficient as possible, and containable.

Building Robots #1: Overview

I'd like to announce a new, long-term project. I won't quite be throwing myself at this per say, but I would like to have something to do on weekends when I'm home, or whenever I just feel like being creative. Some people draw, others make videos, but I would like to start putting together robot frames. I think what I would like to do is to is to create a model of each type of robot, and then continuously improve on each design. I would start with the simplest variety, and gradually build up to the more complicated ones, since I'm of the belief that there are inevitable mistakes to be made, and I'd rather get those out of the way as quickly as possible, in a low-risk situation. Here are some of the models I would like to build:

  • Turtle
  • Rover
  • Walking
  • Arm/Gripper
  • Humanoid
From the progression, one can see the rise in difficulty as you go down the list. For example, a humanoid robot needs to both be able to walk and use its arms, while a turtle robot is pretty much a saucer with wheels. I also like this broad approach because I can be as simple or complicated as I would like. No matter how simple it sounds there, there are still many components to consider. Here's an idea of the workflow of building a robot:

  • Wiring: This is equivalent to the nervous system in a human body, You need wiring that puts into motion the function you wish to complete. This will involve a combination of sensing and the use of motors.Without the wiring, you just have an inoperable frame that's more like a toy.
  • Construction: This will be new for me, but I'll have to construct bodies and frames as well. This will involve creating larger, light frames, as well as intricate work with gears and maybe even plastics. My father has a lot of know-how on this end, and should be able to help make some pieces for the large parts, and I'm sure I can find a way to make ends meet with the intricate parts as well.
  • Programming: Here's the part I enjoy the most, taking this shell you constructed, and giving it life, whether it be through your control, or through autonomous programming. I hope to explore both along the way, although I also enjoy designing controllers.
It seems like a lot of work, but certainly has the makings of a great hobby. I imagine the excitement will build the further I get involved.

Drone Following #7: At last, a sensor

Good news, everyone! I finally managed to get my hands on an IMU. I know it's been a while, but also, I think the professor that was going to supply me with one gave up. Luckily, I managed to pick one up from Sparkfun's great Cyber Monday sale. Not only am I surprised that anyone had a Cyber Monday sale, but also, that they were selling decent goods at decent prices. I picked up a 9DOF IMU (LSM9DS0) normally valued at $30.00 for just $15.00.

I'm glad that it's on it's way, because it means I can continue work on this exciting project. However, there will also be a lot of configuring and reading to do. This presents a good opportunity to learn more in-depth about IMUs, Gyroscopes, Accelerometers, and Magnetometers. I may do a write up on Camera Eye about what all I've learned, so I can share it with other people. If you'd like to investigate more about this chip yourself, Sparkfun has a guide here

Anyways, as it stands, I'm currently wrestling with my last week of classes and finals, but I will be spending my winter break taking on projects like this one, and some other ones I have with friends, so stay posted!

P.S. Here's a video using the same chip for controlling a camera.


Thursday, September 18, 2014

Drone Following #6: Buying the right sensor

I'm having a hard time choosing which sensor to buy for the Drone following project. It's just as much as a mathematical question as it is a computational one. Let me put it to you this way, an Accelerometer is associated with acceleration, and a Gyrometer is associated with velocity. If you understand the calculus relationships there, you can interpolate "the next integral up" (velocity from acceleration, position from velocity, etc.), but it comes with a fair amount of error.

What we need from this project is a way to detect a change in rotation from the person, as well as a change on the two dimensional plane. This could be done by mapping the person's theoretical position, but again, even with the velocity and acceleration information, it can get kind of scary. Thankfully, the angular velocity of the person rotating can easily be extracted with a gyrometer, but that leaves the more difficult question... what about movement?

An important thing to consider is also how you plan to implement the system. You could do it with a position-tracking system, or you could "take things down a notch" and think in terms of velocity. I chose the latter, after thinking back to my teleoperation node for the Pioneer. Everything you see the joystick doing is actually "telling" the robot to change it's velocity in one direction (with some scaling). That being said, I think the same could be done for this project. ROS communicates messages quick enough that, as long as things didn't get dicey, the Drone could follow the person's velocity, or at least I think.

This kind of ambiguity doesn't leave me in a good place to buy some equipment. Thankfully, since the consummation of my project and my Electronics course's project has finally occurred, I can lean on the department to buy a nice sensor (that they will own for other student projects hereafter) at no risk or expense to me. Therefore we went with a complex 9 DOF stick from sparkfun. After all, you can just ignore the aspects you don't need until you get to that point. And who knows, maybe if this goes well, this chip could be the kind of thing we'd want for the head tracking, and then maybe just a simple one-axis gyro on the back.

I imagine it'll be a little bit before it gets here, so I'll spend more quality time with my Drone. It'd be a blast to get it configured with ROS!


Drone Following #5: Getting ROS onto the Arduino.

Sorry for no updates in a while. If you haven't heard, I founded a robotics club, and I have a Differential Equations exam this week.

However, in my electronics course, I had some success uploading ROS onto the Arduino, which is certainly a step forward. I expected it to be a lot more difficult than it actually was, but their were a few tricky elements. I find that the stage of just getting everything installed is FAR more frustrating than actually programming and compiling.

The most confusing thing, which I'll be sure to specify here, is that, in Ubuntu, the Arduino's 'libraries' and 'tools' directories are not in the sketchbook directory like every other OS I can think of. It is instead in
/usr/share/arduino
 so don't let that trip you up if you want to add anything to your IDE.

With that out of the way, it's time to set sail for rosserial. Here you'll find a great set of tutorials as well as a good video explanation of why you would want to use ROS on an Arduino project:


In short, it's one of those many "reinventing the wheel" moments that comes as part of being a programmer. Also, if ROS supports whatever else you're working with, just think of ROS as the dinner party both of these members will attend. Now, I have a means of making the Drone communicate with the Arduino, my "sensor stick".

After getting through the installation bores, you can check the first tutorial, a sample publisher. You should find that it's pretty easy. When you finish you should have a new topic, "chatter", that contains a "Hello World" message from the Arduino!


This may not be impressive in itself, but imagine if we modified this a little bit. Imagine a theoretical sensor running from the arduino and writing that data to ROS. You now have valuable, instant information at your fingertips. So now it's time to get the Drone talking and order a sensor. I'll make a separate post about that arduous process.


Monday, September 1, 2014

Drone Following #4: Possible Hardware, Possible Expansions

I seem to have a lot of ideas whenever I'm biking. Perhaps it's that it just puts me where I would be when the project finally comes together. That, and I really enjoy pretending I'm on a lightcycle.

I've been thinking about the device to use more and more. The device we choose will be important, because it needs to guide the drone. The drone will essentially have no native information about it's orientation, and we want to supply that from the human being via a device. I believe I've settled on using an Arduino for the time being. They happen to be something I have in abundance and I have an upcoming project for one in an electronics class.

However, an Arduino alone won't do it. I was thinking about what kind of shield would be most appropriate for the situation. I thought a little bit about maybe a GPS shield,  but for the time being I think that's a bit overkill. I was thinking actually of using a 
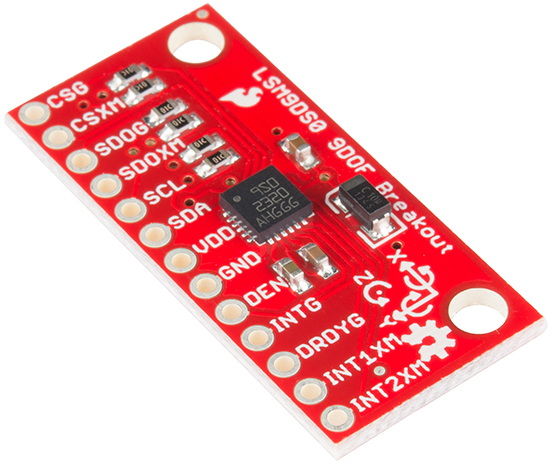
gyrometer shield. The idea of wearables excites me these day, so I was considering having the target wear the the arduino on his/her back, and having the drone figure its angle from the information on the Arduino. I was worried that this might be concern, with too many axes and too much sensitivity for extreme sports and the like; however, I saw that you can get a decent, low sensitivity two-axis gyroscope for a good price. This may be the key to acquiring information from the arduino. It may even need lowered sensitivity yet, but it only really needs to perceive the angle at which the person is facing. The extra axis can perhaps be used to better to connect the camera to the user.

The Math: So we have three basic factors we need to keep in mind here: distance from the user, and the angle the user is facing. Sounds like a job for Polar Coordinates! The reason I mention Polar Coordinates, is that as the user rotates, we want the drone to 1) change degrees to face camera at user, and 2) physically move behind the user in an arc. The change in degree is simple enough. If we imagine the gyroscope as facing the drone, then we the drone to maintain a -180 degree relationship to it. Perhaps before this adjustment is made, the drone can take this change in degree to calculate the arc to form, and then perform them simulatenously!

However, how to track movement has not yet been decided. It doesn't necessarily have to be true movement, in that it's constantly monitored and applied for us, but rather relative movement, similarly to how the gyrometer works: The Arduino just needs to know the amount of change, so it may be applied to the drone.

Possible Expansions: I should be getting this far ahead of myself, but when you're excited it's inevitable. It's what keeps projects interesting, and helps you seperate yourself from the rest of the pack. So, imagine this. Imagine if we applied all of the rules of the first arduino, to a second, head-mounted, arduino that affected the camera's movement: your eye in the sky. You're riding your bike, the drone is following. You tilt your head because you swear you spotted a wild sasquatch. The drone, maintaining it's following pace, tilts the camera to face the same direction, capturing 720p footage of the sasquatch and making you famous. I've got it all figured out. But really, this could be quite a useful feature! Additionally, if you were mathematical about the velocity, acceleration and time, you could have the camera only angle itself as the same theoretical time that you did, so almost like a transformation of you riding your bike, to a drone in the sky.


Understood limitations: It dawned on me right now that since this is ROS based I need to somehow have a laptop available during testing. I will be considering ways around this once I get to the point where everything is communicating properly (hint: it may involve a Raspberry Pi and a router).

Stay tuned for more updates!

------------------------------------------------------------------------------------------------------------

Thursday, August 28, 2014

Drone Following #3: Collaboration and Ideas

Haven't done much flying since the last post but quite a bit of logistical thinking-- both alone and with others. I have two friends interested in working on this project with me-- my girlfriend, Nicole Lay, a Computer Science graduate, and my friend, Aaron Bradshaw, an engineering student at University of Kentucky. You may have noticed the yet unfulfilled "AJ Labs" link over at leibeck.tk, and that's what we intend to put there. It's really touch and go while we figure out how we want to share our information, so for the time being just know they are contributing from close or afar.

In terms of the project, I've tried to make it into a basic logistics problem. What kind of information are we receiving, what information can we derive from this existing information, and how can we use this connectivity to achieve our goal. So let's do it this way:

The Problem: We want to be able to have the drone follow targets during a variety of activities.

Current Thoughts: Connecting the drone to another "theoretical" device in order to orient the drone towards the device, and to follow it.

Available Information: On the ardrone_automony github page, you can see a concise list of the accessible information:


  • header: ROS message header
  • batteryPercent: The remaining charge of the drone's battery (%)
  • state: The Drone's current state: * 0: Unknown * 1: Inited * 2: Landed * 3,7: Flying * 4: Hovering * 5: Test (?) * 6: Taking off * 8: Landing * 9: Looping (?)
  • rotX: Left/right tilt in degrees (rotation about the X axis)
  • rotY: Forward/backward tilt in degrees (rotation about the Y axis)
  • rotZ: Orientation in degrees (rotation about the Z axis)
  • magXmagYmagZ: Magnetometer readings (AR-Drone 2.0 Only) (TBA: Convention)
  • pressure: Pressure sensed by Drone's barometer (AR-Drone 2.0 Only) (Pa)
  • temp : Temperature sensed by Drone's sensor (AR-Drone 2.0 Only) (TBA: Unit)
  • wind_speed: Estimated wind speed (AR-Drone 2.0 Only) (TBA: Unit)
  • wind_angle: Estimated wind angle (AR-Drone 2.0 Only) (TBA: Unit)
  • wind_comp_angle: Estimated wind angle compensation (AR-Drone 2.0 Only) (TBA: Unit)
  • altd: Estimated altitude (mm)
  • motor1..4: Motor PWM values
  • vxvyvz: Linear velocity (mm/s) [TBA: Convention]
  • axayaz: Linear acceleration (g) [TBA: Convention]
  • tm: Timestamp of the data returned by the Drone returned as number of micro-seconds passed since Drone's boot-up.

  • Derivation and Communication: Of particular interest for my idea is the rotz parameter. If our "theoretical device" could have a similar parameter, but with certainty, we could line up the two devices on similar plane, and have the drone maintain a 180 degree relationship, facing the device at all times. And as long as the device maintained the ability to be moved relatively, this transformation could be applied to the drone. As you can see, most of this relies on a communication and transformation from the external device.

    The Device: We're also putting a lot of emphasis on what the particular device could be. For the sake of my upcoming project for electronics course about microcontrollers, I may consider using an Arduino with a GPS shield, if that is indeed a possibility. It could expand to mobile devices like phones and tablets, but getting an app and setting it up to communicate with ROS could be even more difficult. We'll see, I suppose. I still need to try my luck at controlling the drone with ROS.

    A side note: It would seem intuitive to purchase a GPS flight recorder for the drone, and maybe give it a better idea of where it is relative to its surroundings, but I feel like this would be "buying" my way out of the situation. I understand that we're talking about a drone and other device, likely bring the cost up past 300-400$, but it's really important to me as an aspiring Engineer to make the most of what's available, not only for the challenge, but to make to make the end result available to the largest group of users. In truth there are already systems that extreme sports athletes use, but I would like expand this type of system to this cheaper platform. That's what it's all about!

    We'll see where this idea takes us. I may not update for a while, but I'll be sure to include my flight videos when I can.

    ------------------------------------------------------------------------------------------------------------

    Wednesday, August 27, 2014

    Drone Following #2: Learning to Fly

    This isn't a terribly programming heavy post, but it is essential to working with and understanding with something that flies-- especially with four rotors. I took my Drone out for its first flight, which was mostly successful. I didn't understand that there was actually quite a bit of settings to configure before flying, but even under less than optimal circumstances it performed quite well.


    The battery life of these devices really isn't that developed yet, but because this is the POWER EDITION, it has high density batteries that boost it close to an hour. In terms of the settings, there's a few key ones to how you'll be flying the drone. Most important is the maximum tilt. This value determines what the acceptable amount of tilt is for the drone. However, this also affects your maximum speed, since, in order to stop, the device may have to tilt past the acceptable limit. Also important is the maximum rotation, which has essentially the same properties, but for rotational properties like turning. These two facts combined essentially form kind of an overall sensitivity. It's pretty difficult to crash and burn when both the tilt and rotation are turned down, so keep that in mind. If you're filming or trying to get shots with the onboard camera, I'd suggest this kind of setting, but I imagine with an external camera (attached to the USB port) like the GoPro, it's probably not too much of a problem.

    There's also a set of lighter features that are good for optimizing your style of flight. Drones can be flown indoors and outdoors, so you there are flip switchs for things like where you're flying, which of the styrofoam hulls you're using, and then a few more gauges like maximum altitude (up to 100 feet), max vertical speed (how fast the drone raises and lowers, etc) and a few others. Before I begin experimenting I want to fly quite a bit to better how understand what behaviors the drone can tolerate, and what settings would best permit these behaviors. Whereas the app requires you open a menu (while flying D: ), whereas on ROS you could probably easily manipulate these settings on the fly.

    Plus that, there's a few novelties such as flips (can be enabled over 30% battery) and "absolute control" (where it spins around and then you can move it relative to where you are), but I've not discovered any pleasing features.

    I hope to log in a decent amount of hours flying, and, more importantly, safely landing before I proceed to use the driver. I'll try to make some of my videos and pictures available so you can maybe determine if you'd like one in the future.


    Drone Following #1: Features and Prospects

    I acquired an AR Drone today for a good price.
    I'm beginning to brainstorm what kind of projects to take on. I have an upcoming microcontroller project in an electronics class I may now utilize it for. The most interesting aspect to me, and really the selling point is the horizontal and vertical cameras, the horizontal capable of filming up to 720p. I already played around with the AR Freeflight app on both Ios and Android, and I was surprised by the options capable within the camera.

    One of the aspects I really want to check out is ROS connectivity. A few people in my lab used these same parrot drones in the lab. I took a look at ar_driver and it appears to be roughly equivalent to a manual version of the AR freeflight app, which is convenient. There's also ardrone_autonomy, which I'll move to after an understanding of the driver.

    My first project though I want to take a look at though is classic teleoperation. I like the free app, and it's great to get started, but I have my own gripes with it. First I want to figure out how to use the drone with my computer and then use some joysticks and other controllers. I have in my possession a Xbox 360 controller, and several wiimotes and nunchucks. I've seen a few interesting wiimote teleoperations that I would also like to investigate.

    Next, I want to work on some automated following. I imagine this can be done one of two ways; either by human recognition or by relation to some mobile device or controller. I think the latter is clearly easier, so I'll likely be working on it first. However, I certainly want to enable Human Recognition at some point, for that would open up a whole new range of projects.


    ------------------------------------------------------------------------------------------------------------
    Have anyone made any cool mods to a drone?